

A question you need to ask yourself is why do you warm up the way you do when throwing? I see too many players throw without a purpose and without being physically prepared. My reason for writing this post isn’t to discuss a pre throwing warm up routine (that will be a separate post), but rather to talk about a throwing progression that is a constraint led approach. For those that don’t know what a constraint is, it is simply putting your body in a position to focus on a specific movement of the throwing delivery. You are trying to improve a mechanical aspect of your delivery in that specific drill. I’m a firm believer that every throw you make should have a focus and purpose. I don’t believe in throwing to warm up. Your body should be physically prepared to throw from your pre throwing routine (bands, dynamic warm up, wrist weights, plyos, etc.). In this post I will discuss the 5 drills I do and utilize with players before progressing into their extended throwing for that day.
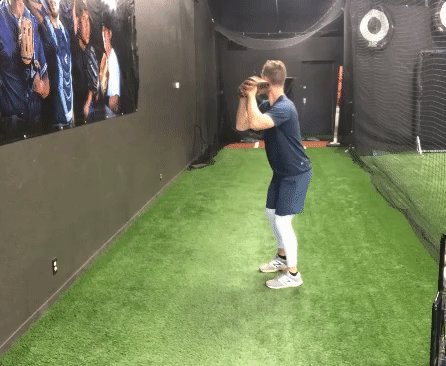
1. Modified Pivot Pickoff

The modified pivot pickoff is a slight alteration to a regular pivot pick. In the modified version I stand with my feet slightly more square towards my target as oppose to being in a straight line. The purpose of this drill is three fold. I like this drill because it is a good opportunity to work on improving thoracic spine rotation (middle part of spine). You should feel a good stretch in your thoracic spine as you reach max rotation. The second thing I like about this drill is it is great for improving arm action. With your feet in a staggered stance (left foot forward if you are left handed, right foot forward if you are right handed) it puts you in a more restricted position allowing you to focus purely on the upper half and to shorten arm action. Another thing this drill helps is glove disconnection. This is the action of the lead arm effectively clearing before the arm reaches the high cocked position. This allows for greater torso rotation velocity. When doing this drill, to over exaggerate, as you reach the end of your counter rotation, let the glove arm begin to drive down before you rotate to throw the ball. The reason I have the feet slightly more square to the target is to progress from the pivot picks done in the plyo work earlier. With the feet more square you are able to get a greater stretch and counter rotation in the throw. Perform this drill from 30-40 feet away.
2. Step Back Roll In

The next drill to perform is the step back roll in. In this drill you will be facing your target and take one step back with your drive leg. Once you step back with your feet facing straight towards your target you will take a step forward to throw. The goal is to keep your hips open the entire time and to focus on separating the upper half from the lower. In other words, we are looking to maximize our hip to shoulder separation in this drill. The step back simply allows you to feel the weight transition from the back leg to the front a little easier. Perform this drill 40-50 feet away.
3. Rocker Drill with Leg Lift

The rocker drill is a very familiar drill for most people. The way I like to set up is to have your feet spread out at a comfortable distance. I think some players make the mistake up spreading out too far making it difficult to move and to get out of the position quickly. Start with your lead leg facing towards your target and bend your knees comfortably. With hand in glove, begin to lean forward towards target and then lean back to the back leg. As you start to rock back towards the back leg, pick your lead foot off the ground a few inches or so before going forward to throw. Once you have your weight on the back leg and your foot off the ground, go forward to throw the ball. There are a few benefits to this drill, but what I like the most is for guys to feel the heavy force on their back side transfer to the lead leg. With this drill you should be landing fairly flush with your foot as oppose to sliding into it. This will help improve lead leg stability and blocking as well. Perform this drill 40-50 feet away.
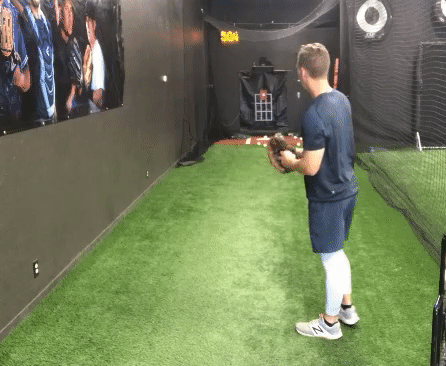
4. Step Back Drill
This drill has grown to be my favorite one to perform and has had a lot of benefits for guys I have used them with. What you will do for this drill is stand closed off to your target like you were going to make a regular throw. Stand with a little bend in your knees and your hands together like you were coming set (keep weight even on feet). From this position you will step back with your back leg a couple feet, gather the body into a small coil, modified leg lift, and proceed to throw the ball normally. What I love about this drill is it is great for anchoring the back leg, as Matt Daniels from Driveline calls it. What that means is we are trying to keep the back hip externally rotated, the outside of the foot connected to the ground as long as you can as you proceed to throw the ball. By externally rotating the hip and keeping more of a vertical shin you are going to improve glute and hamstring activation as oppose to more quad when you internally rotate the hip too soon. Perform this drill 50-55 feet away.
5. Casual Wind Up
The last drill before progressing to shuffle throws for the long toss portion is the casual wind up. The purpose of this drill is to start to feel your delivery take shape after performing the previous four drills. This isn’t supposed to be an uptight drill where you are coming set and pitching. Be relaxed with this and step into the throw as you please. I usually have guys perform this drill out to about 90 feet before shifting to shuffle throws. Perform this drill starting at 60 feet and progress up to 90 feet.
Things to Note
The rep scheme has a lot of freedom based on what you think you need. Reps can range from 5-10 for each one. I would recommend doing more reps on the drill you think you need the most. Another thing to note is the intensity on these. Depending on what you do as a part of your pre throwing routine will dictate the intensity. If you are a guy that does the Driveline protocols and incorporates plyos, you can ramp these up in the 70-80% RPE range depending on the day. If you are a guy that doesn’t do much before throwing you’ll probably need to start at a lower intensity and build up gradually (get on a good pre throwing routine!).
Conclusion
These are by no means the only drills you can do. I would encourage you to get creative and think of drills that are going to improve your desired outcome when you pitch. All of these drills are designed to improve your mechanics on the mound. That is where it counts. You’ll also notice that these drills gradually progress to mimicking a regular throw. Choose to use these drills as you please and as frequent as you would like. I use them as a part of my daily throwing routine, but will adjust reps and intensity depending on the day. Thank you for reading and as always, reach out with any questions or comments!
- Jared
-
August 2022
- Aug 19, 2022 To add velocity, first throw slower. Wait, what? Aug 19, 2022
- Aug 15, 2022 I Wish I Did This as a High School Baseball Player Aug 15, 2022
-
May 2022
- May 9, 2022 The Case for Development In-Season May 9, 2022
-
April 2022
- Apr 25, 2022 How Pitchers Can Improve Their Bullpens Apr 25, 2022
- Apr 18, 2022 Adjusting Goals In-Season Apr 18, 2022
- Apr 11, 2022 How to Throw More Strikes Apr 11, 2022
- Apr 4, 2022 Developing a Catch Play Routine Apr 4, 2022
-
March 2022
- Mar 28, 2022 How to Master the Left Handed Pickoff Move Mar 28, 2022
- Mar 21, 2022 How to Develop Your Own Pre-Pitch Routine Mar 21, 2022
- Mar 14, 2022 How to Develop Fielding Skills in Youth Baseball Players Mar 14, 2022
- Mar 7, 2022 How to Develop Youth Baseball Hitters Mar 7, 2022
-
February 2022
- Feb 28, 2022 How to Develop Throwing in Youth Baseball Players Feb 28, 2022
- Feb 21, 2022 What Players Want From Their Coach Feb 21, 2022
- Feb 14, 2022 What Correlates to More Wins? Introducing K:FB Ratio Feb 14, 2022
- Feb 10, 2022 How to Turn Your Failures into Success Feb 10, 2022
- Feb 7, 2022 How to Create a Plan for Bullpens Feb 7, 2022
- Feb 3, 2022 How Jordan Marks Added 6 MPH to His Fastball in One Summer Feb 3, 2022
-
January 2022
- Jan 31, 2022 Why You Can Throw 300 Feet, But Can't Throw 90 MPH Jan 31, 2022
- Jan 27, 2022 Do Weighted Balls Actually Increase Velocity? Jan 27, 2022
- Jan 24, 2022 Are You Doing These 2 Things In-Season? Jan 24, 2022
-
August 2020
- Aug 18, 2020 The Effect of Thumb Position on Fastball Movement Aug 18, 2020
-
April 2019
- Apr 3, 2019 How to Improve your Breaking Ball Apr 3, 2019
- Apr 1, 2019 Improving Lower Half Mechanics and Separation Apr 1, 2019
-
March 2019
- Mar 29, 2019 Designing a Changeup Mar 29, 2019
- Mar 27, 2019 Year Long Throwing Program: High School Edition Mar 27, 2019
- Mar 25, 2019 GSP Pitching Philosophy Mar 25, 2019
- Mar 24, 2019 GSP Throwing Program Overview Mar 24, 2019
- Mar 19, 2019 Dallas Keuchel: Slider Breakdown Mar 19, 2019
- Mar 12, 2019 Release Points: Getting Brian Duensing Back on Track Mar 12, 2019
-
February 2019
- Feb 21, 2019 Transferring Bullpens to the Game Feb 21, 2019
- Feb 13, 2019 Is "Saving" Pitches the Right Approach? Feb 13, 2019
- Feb 5, 2019 What Actually Correlates to a Pitcher's Success? Feb 5, 2019
- Feb 1, 2019 Relief Pitcher Pre-Game Routine Feb 1, 2019
-
January 2019
- Jan 28, 2019 Starting Pitcher Pre-Game Routine Jan 28, 2019
- Jan 24, 2019 Core Velocity Belt to Improve Movement Patterns Jan 24, 2019
- Jan 21, 2019 In Season Starting Pitcher Schedule Jan 21, 2019
- Jan 17, 2019 College Relief Pitcher In Season Throwing Program Jan 17, 2019
- Jan 14, 2019 Analytical Approach to Pitch Location Jan 14, 2019
- Jan 9, 2019 Recovery Circuit and Conditioning Options Jan 9, 2019
- Jan 5, 2019 4 Ways to Improve Mental Skills Jan 5, 2019
-
December 2018
- Dec 19, 2018 How to Improve your Deadlift Dec 19, 2018
- Dec 12, 2018 Tommy John Rehab: An Unconventional Approach Dec 12, 2018
- Dec 5, 2018 Medicine Ball Exercises to Improve Mechanics Dec 5, 2018
-
November 2018
- Nov 28, 2018 Three Anti-Rotation Exercises Every Baseball Player Should Be Doing Nov 28, 2018
- Nov 21, 2018 5 Constraint Drills for your Throwing Program Nov 21, 2018
-
July 2018
- Jul 20, 2018 The Why and How for Training Throwing Velocity Jul 20, 2018
-
June 2018
- Jun 24, 2018 Lima Locos: Player Development Part 2 Jun 24, 2018
- Jun 18, 2018 Lima Locos: Summer Baseball and Player Development Jun 18, 2018
-
October 2016
- Oct 5, 2016 More Than Just a Game Oct 5, 2016
-
September 2016
- Sep 19, 2016 Off-Season Programming Sep 19, 2016
- Sep 4, 2016 Nutrition Basics Sep 4, 2016
-
August 2016
- Aug 17, 2016 What the Best Pitchers and Hitters Have in Common Aug 17, 2016
- Aug 13, 2016 Faith and Determination Aug 13, 2016
-
July 2016
- Jul 25, 2016 3 Ways to Separate Yourself Jul 25, 2016
- Jul 8, 2016 Warming Up with a Purpose Jul 8, 2016